
Final Project of ECE5725
By Gengqiao Xie (gx55) and Jie Feng (jf832)
12/13/19

We completed a game called ‘Legend of Pielda’ with one player and four kinds of enemies. The player can walk in four directions with the control of arrow keys. When the enemy walks close to the player, it can attack the player. The first enemy is the rat with no special ability. The second enemy is the mummy who can restore itself health. The third enemy is the goblin who can eject the fire to attack the player. The fourth enemy is the necromancer who can restore health for other enemies. The player has two potions which can restore health and mana. The player has four abilities to attack enemies. The first ability is to eject the fireball and if the fireball hits the enemy, the enemy will lose health. The second ability is the frost nova which can attack all of the enemies in a region, making them lose health and decrease the speed. The third ability is the whirlwind which can attack all of the enemies it meets in its forwarding path. The fourth ability is the entangling roots which can stun the enemy and make it lose health continuously for an amount of time. The player also has items such as boots and amulet. The item boots can increase the player’s speed. The item amulet can make the player restore mana more quickly.

Figure 1 the start of the game
To start the pygame, we ran the following commands:
pip install pygame
Aslo there is some quick way to install by using the requirement.txt made by me
pip install -r requirements.txt
Once we finished the above step, we can test with the pip freeze, the command is as following :
pip3 freeze
pygame==1.9.4.post1
In this step, we build the map, add the player’s potions, show the enemies and the player’s four abilities logo in the map without actual functions. The map editor is a hashmap, it maps each character in the txt file to one kind, for example, ‘p’ represents player and ‘s’ represents wall. The editor will call the corresponding initialize function according to different characters, and then it will add an instance in the map. For the player, we add potions. The player has two potions: restore health and restore mana. When the player picks up a health bottle or a mana bottle, it will be added into potions’ boxes. We use a list to store its potions and we set the maximum amount of potions the player can have to five. When the player’s health goes out, it can use a health bottle, and its health will be restored to full amount. To be specific, we first compare if the player’s current health is less than the max health, and if so, we will call the gain_health function we have already written. For the gain_health function, we compare the values of the player’s current health plus the amount of health we want to add to the max health(we assign it to 100) and returns the minimum value. The same situation happens for the mana. When the player’s mana goes out, it can use a mana bottle, and its mana will be restored to full amount. The implementation is roughly the same as restoring health. The player has four abilities. We add logos for these four abilities. For example, for the first ability fireball, the player can eject the fireball but it cannot attack enemies. We will implement the specific interaction functions in step 2. For testing, we test the map, the player’s potions and all logos being displayed in the map. The pictures below are the testing results.


Figure 2 & 3 the initial version with player, its potions abilities and enemies
In this step, we add enemies’ properties and the player’s four abilities for actual attack. We first add objects that the player and enemies all need in the core function, such as the damage calculation, register of ability, movement, direction, etc. Then we build a higher level class, grab the specific objects we need from the core functions, combine them together, add some unique properties to assemble a new object. Then, we grab these new objects, combine them together to form a character or some bigger objects, such as map. Based on this work, we complete four kinds of enemies. The first enemy is rat. There are two kinds of rats, the grey rat and the brown rat, with different sizes, different movement speed, different initial health, etc. The rat has no special ability. The second enemy is mummy, it can restore itself health by calling the regeneration function per millisecond. We have a time detection function, that is, if the time exceeds the threshold, the time will be updated and will regenerate itself health. The third enemy is goblin which can eject the fire and if the fire hits the player, the player will be damaged and lose some health. To be specific, the fire hits the player means they collide, the collision function is in the pygame property. If the collision happens, it will call the damage function to the player we have written before, and the player will lose health. The fourth enemy is the necromancer who can restore the nearby enemy’s health. The necromancer first detects the nearby hurt enemies, which means the enemy is in the nearby specific region by calling the with_in distance function we have written before, and the enemy is damaged which means its health is less than the max health. After finding the nearby hurt enemies, the necromancer will choose the first enemy to restore health for it by calling the gain health function. The player has four abilities. The first ability is to eject the fireball which we have completed in the first step. In this step, what we add is when the fireball collides with the enemy, the damage function to enemy will be called, and the enemy will lose health. The second ability is the frost nova which is an area of effect. All of the enemies in a specific circular region will lose health. Also, we apply the buff effect to reduce the enemies’ movement speed for an amount of time. The third ability is the whirlwind which is an area of effect. The whirlwind moves forward in a square wave, for each enemy it collides with in the path( we encapsulate the collision function pygame property provides into the intersecting function), the enemy will lose health, and we also use the buff effect to make the enemy stun for an amount of time. The fourth ability is the entangling roots which ejects a ball and if the ball collides with the enemy, it will make the enemy lose health. We also use the buff effect to stun the enemy for an amount of time and continuously lose health. Pictures below show our testing for this step.

Figure 4 Display the enemy of two kinds of rats
In this step, we add the items for the player and update the items in the map. There are three items: boots, amulet, and sword. When the player picks up an item, it will have this ability forever. For the boots, we use the item effect which can increase the player’s movement speed. For the amulet, we use the item effect which can speed up the mana regeneration, that is, each time an amulet is picked up, the player’s property mana_regen will be added a constant factor, when the player’s property is called, it has been updated, so the player’s mana can be restored more quickly. For the sword, we use the item effect which can restore itself health when attacking an enemy. The idea is basically the same as the amulet. Before picking up the sword, the player’s property life_steal_ratio is 0. So the player will not restore itself health whenever attacking enemies. But each time after picking up a sword, the player’s this property will be added a constant factor. So when attacking an enemy, the player can restore itself health.

Figure 5 Display the all kinds of enemies
Figure 6 Item in the maze
Set up the screen, add startx command into the config so that the system will goes into the table once the system is boosted
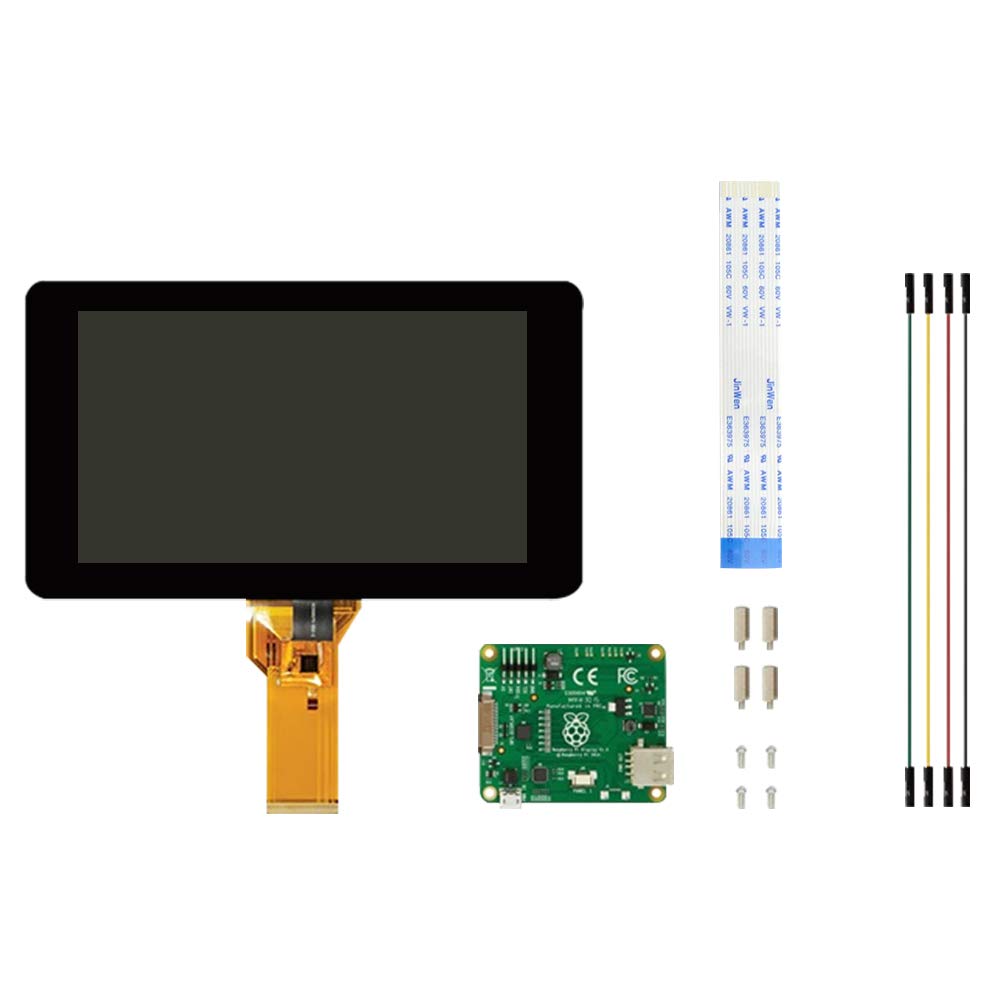
Figure 7 7inch touch screen for raspberry pi
Our game’s size is 500*500 pixel, this screen’s size is 720*480 pixel, so it cannot display all of the contents. Pictures below are the testing results we use this screen.

Figure 8 Displaying with the touch screen
And below is our wiring schematic diagram:
Figure 9 Display when the player died
The picture above is our general design idea for this game. The left part is the module, including enemy, player, item, potion, ability, make damage, update location, regain mana, etc. Make damage, update location, regain mana and a lot of other methods are in the core function, they are the sub modules in a module which can be used by the characters. The middle part is control. The map editor maps each character in map.txt to one kind to initialize different objects in the map. The collision detection is provided by the pygame property. When collision happens, it will call the methods in the core function, and the methods will update the character’s property. We control the events through keydown. The right part is the vision display. We use the drawing provided by pygame to draw with the data and module.
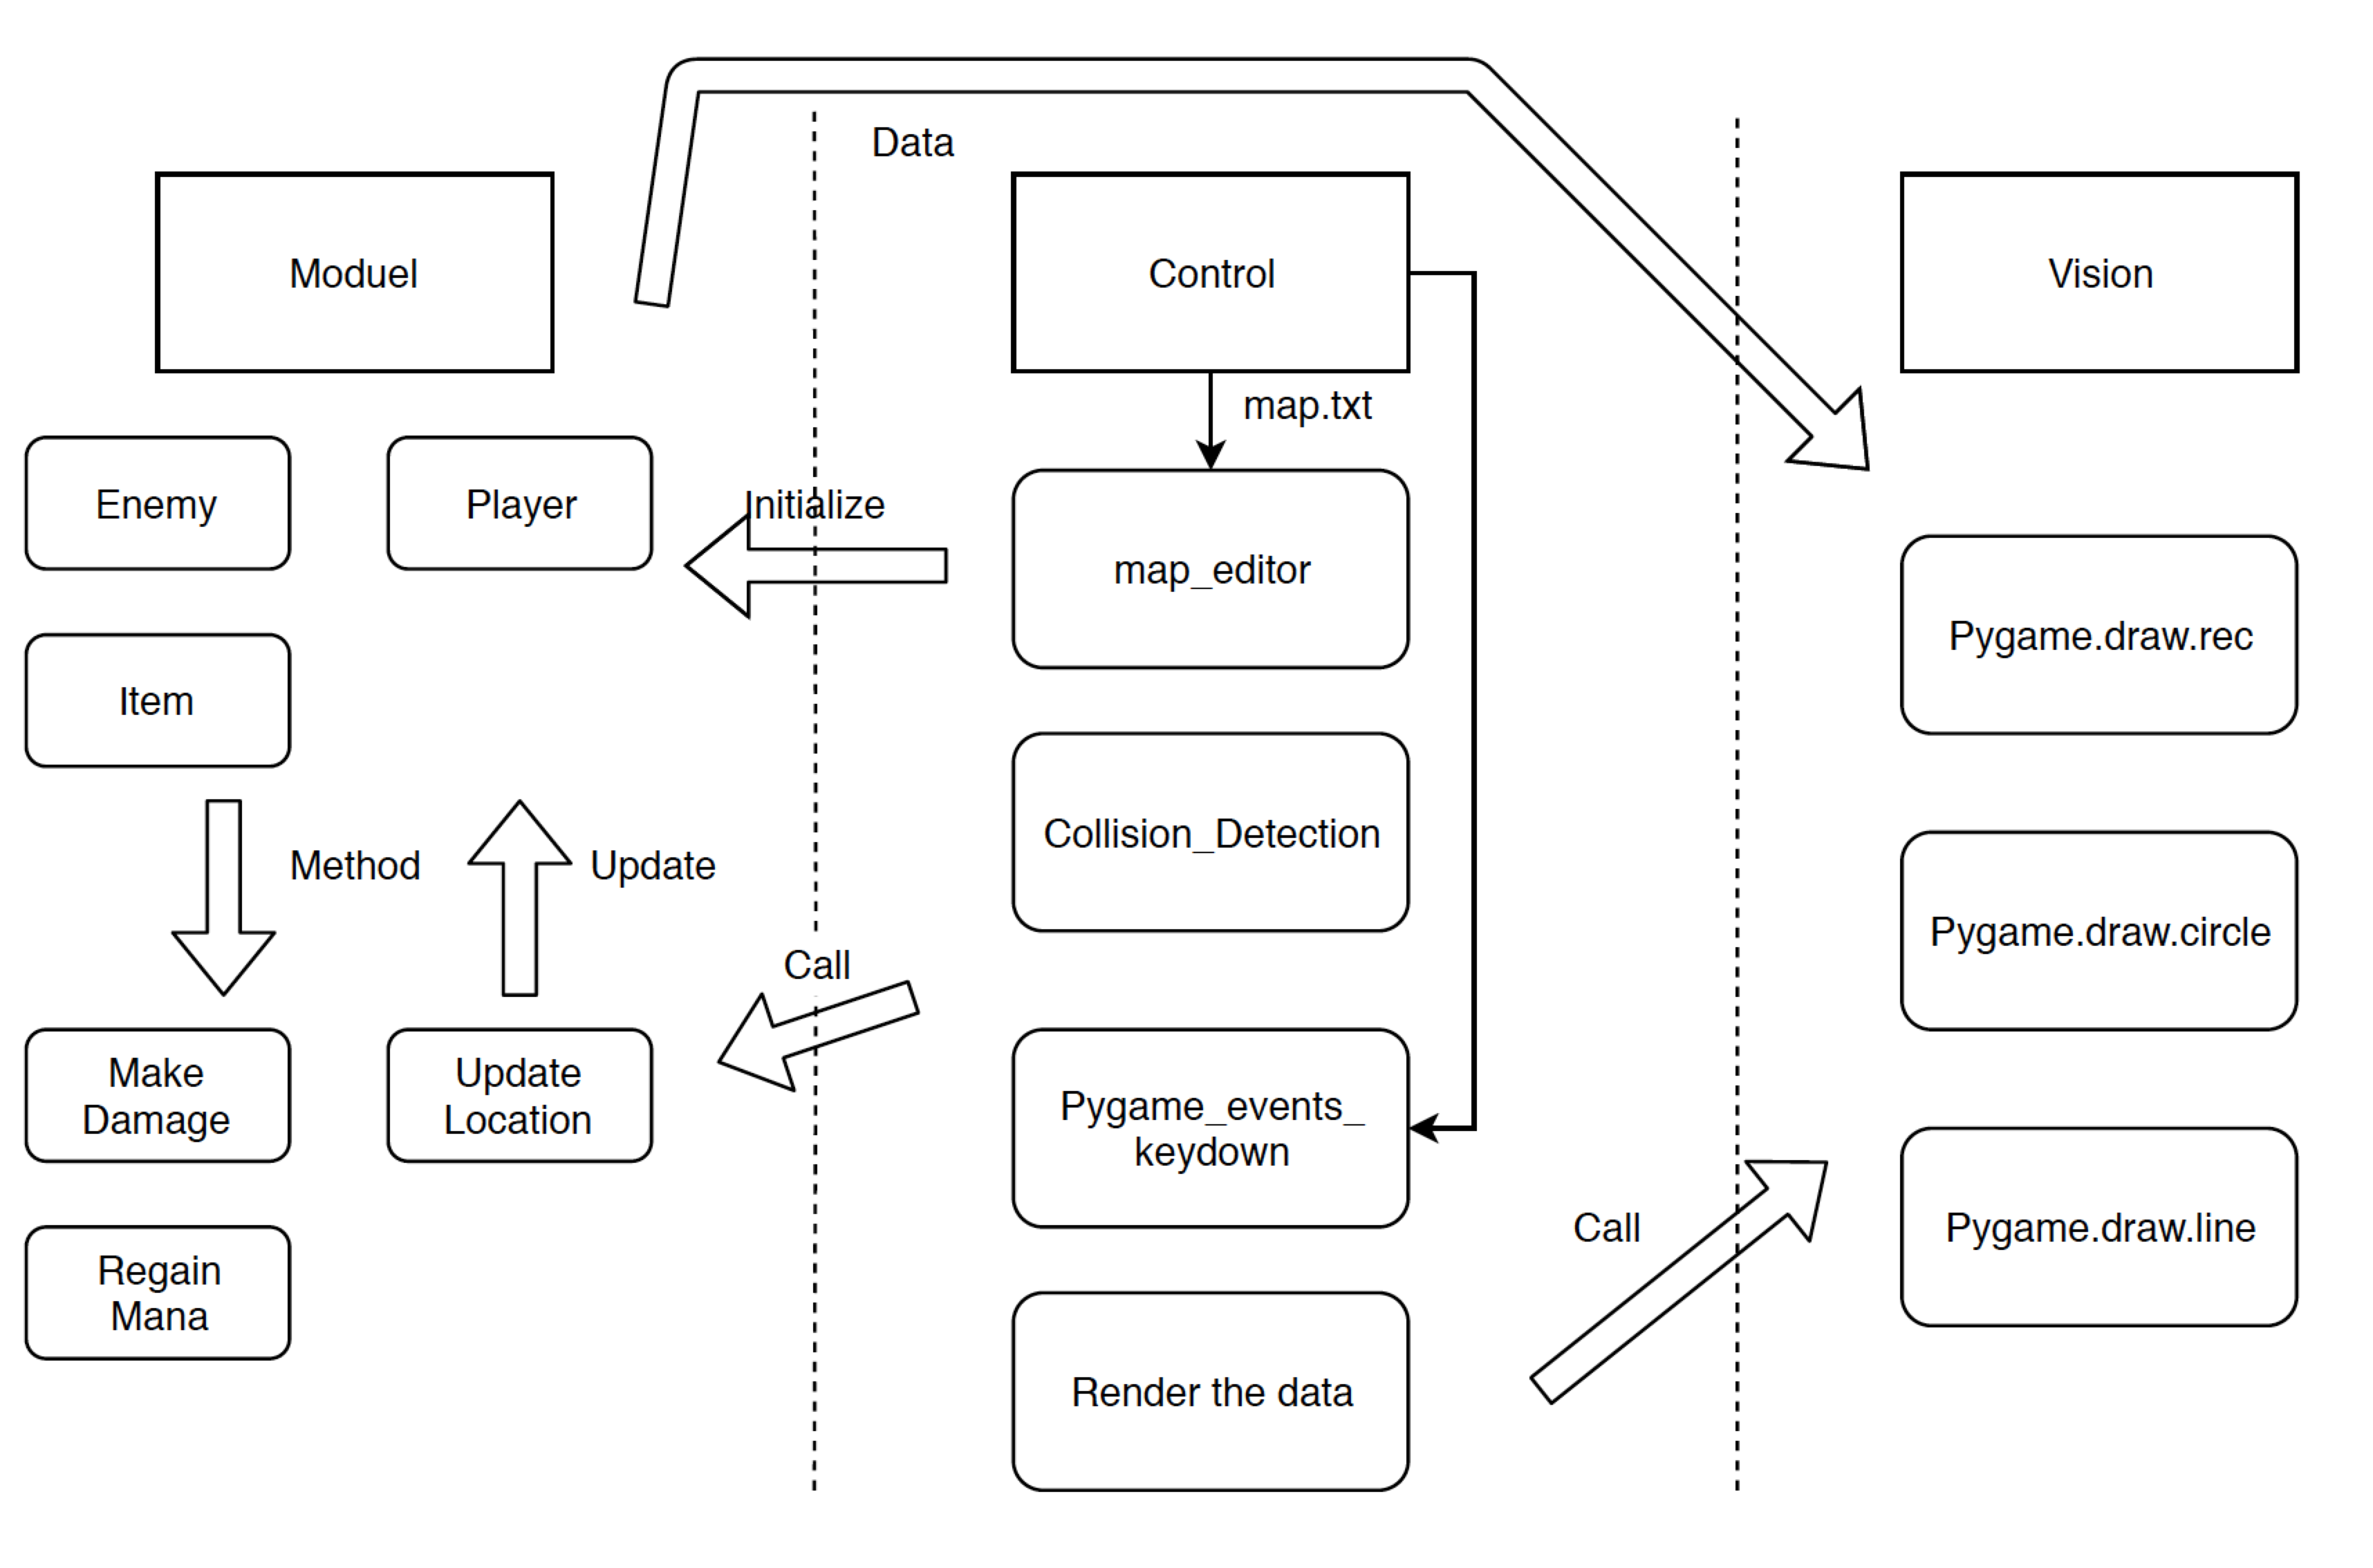
Figure 10 The System Detecting Yingrong and Zhaoyi
Actually, we failed several functions we planned at the beginning. We failed to add the music with the mixer, also we have no time to build up a scene to add a story to the game. The whole game is more like a demonstration of all functions. We failed to use the gpio to control the game because the pygame has the inner built library to detect all keys in the keyboard. However, using gpio is really hard to implement such key buffer, so we decide not to use the gpio buttons. However, we do have some implementation which is out of expectation. We build multiple kinds of enemies with different abilities, enable the character to have more abilities instead of only using arrows and swords. We have the buff system and Aoe abilities which are really impressive. Also, we add several items and portions to make the player more flexible and dynamic. We also add fps rendered to make it easy to debug.


gx55@cornell.edu
mainly responsible for the core function, worked on the scene and control system
Tested and debugged the system

jf832@cornell.edu
mainly responsible for objects of enemies and abilities.
Tested and debugged the system

There is almost 10,000 lines of codes in this project and also the resource images so we upload the codes in rogers' Repository Github Repository
We have learnt a lot through this final project, from the initial design to the progress in each step, including meeting problems and trying to solve it. Thanks to professor Joseph for providing meaningful suggestions and thanks to TAs for patient help.